Friday, September 5, 2014

Burlap Wreath.

I made my first Burlap Wreath this week!

And, it was so much easier than I thought it would be.


  I love the way they look, rustic and fabulous. They are simple to assemble and customize. So, I made one for my sister-in-law, as a birthday gift. After looking around on Pinterest for ideas, I headed to the store for supplies, then got to work.


What I needed:

  • 5 in x 10 yd burlap x 2 rolls
  • 18 in. metal wreath hoop
  • 5 in x 5 yd of dyed burlap
  • several short pieces of pipe cleaner
  • wooden letter & acrylic paint
  • hot glue gun & plenty of glue


  First, I painted the letter teal. I didn't like the color, so I repainted it black, then settled on beige.


  Next, I began making the wreath. I started by anchoring the end of the burlap to the front of the hoop, with a small piece of pipe cleaner.
  I would describe making the wreath as weaving. I wove the burlap into loops from underneath about 3 inches upward into the inner ring, then the middle ring, and then the outer ring. And, repeated the process, working my way around. I fluffed up the burlap loops as I went, to give the wreath a full, even look. The first roll of burlap went a little more than half way around the ring. I secured the end of the burlap to the hoop with another piece of pipe cleaner.

I wove up 6 loops of burlap on the hoop between each cross piece of metal.
You could weave even more loops upward to create a more voluminous wreath.


An example of the loops of burlap, coming up
from underneath the hoop.


  After I went all the way around the hoop, I tied the end down with a piece of pipe cleaner. There was about 1 1/2 yards of burlap left over.

This is the basic burlap wreath.

  Then, I added some dyed burlap to the front of the wreath. I attached the dyed burlap to the center of the metal hoop every 3 to 4 inches, all the way around.

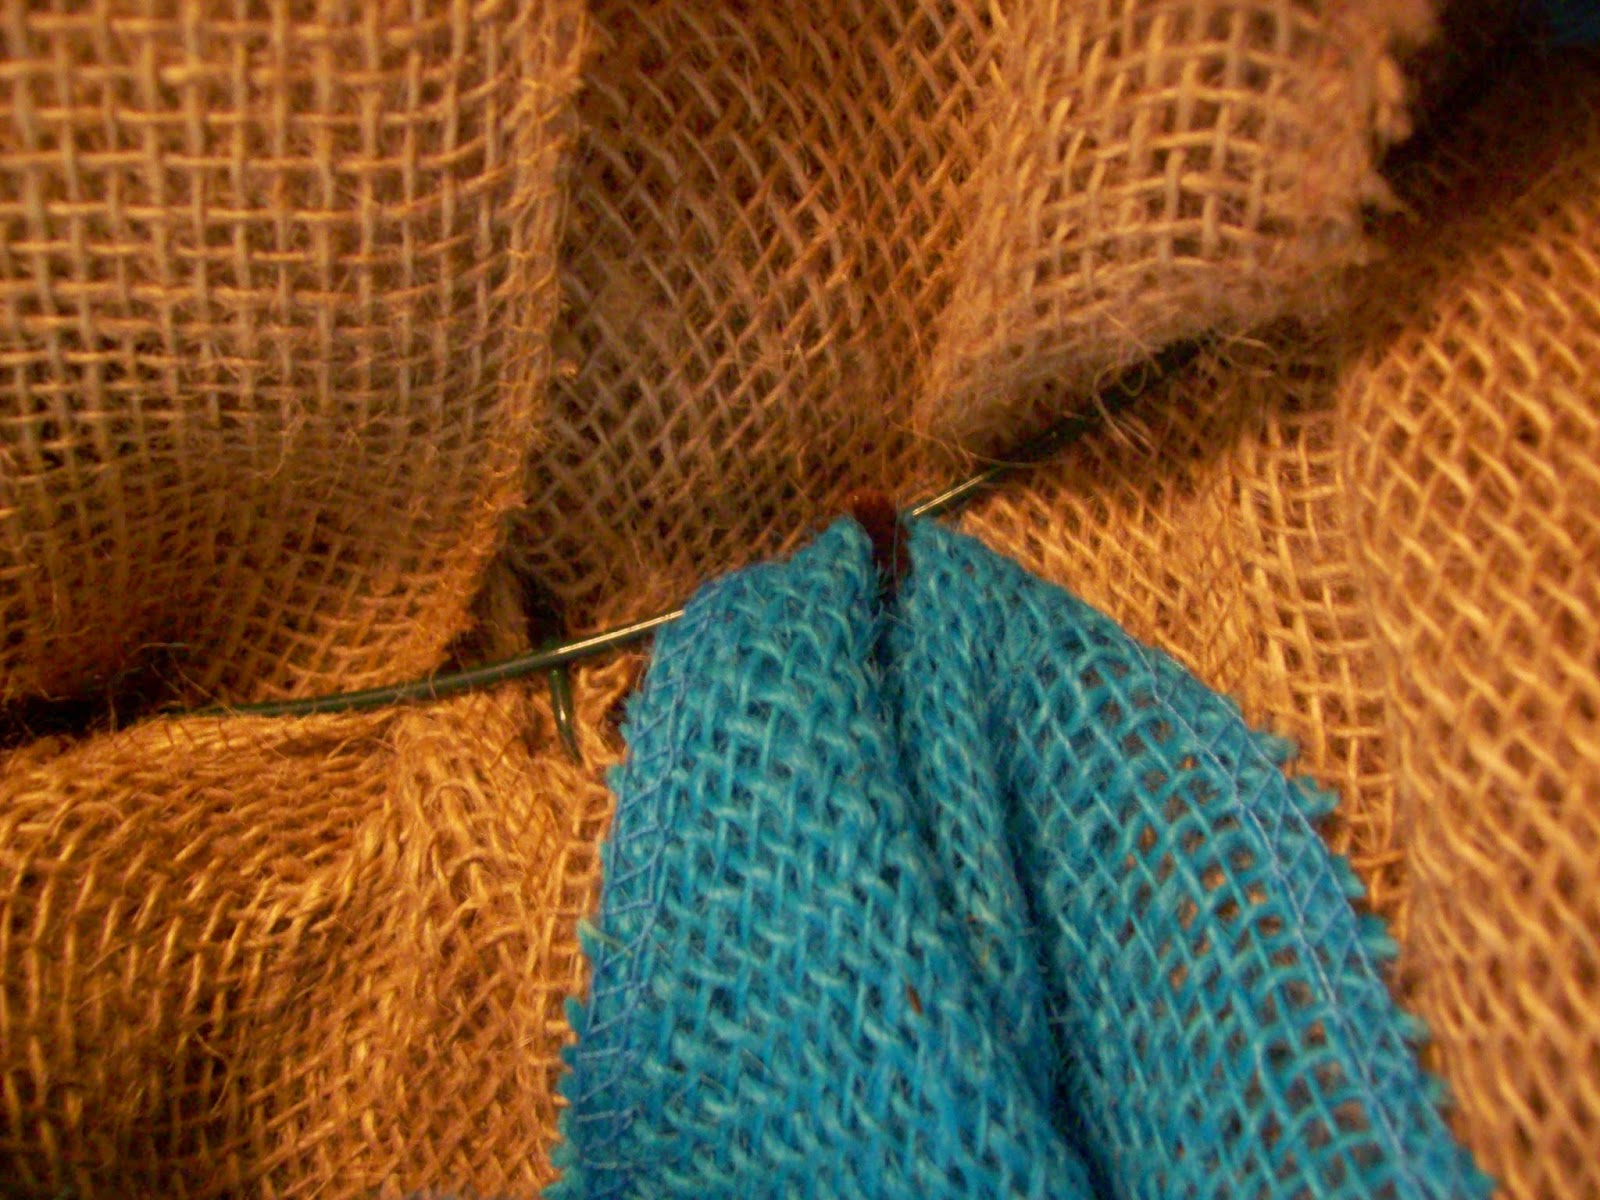
Fastening the dyed burlap to the metal hoop
with pipe cleaner.


   Using the left over pieces of burlap, I created two bows for decoration. First a burlap one, then a slightly smaller one made from the dyed burlap.


 The photo on the left is the best example I have of how I made my bows. I laid the burlap just like that dyed burlap, and squeezed the center together with a piece of pipe cleaner.


 For more information about making bows like
these, lots of great tutorials can be found on 
Pinterest.


  I placed the dyed burlap bow on top of the burlap bow, and wrapped a small piece of the dyed burlap around both, securing it with piece of pipe cleaner. I finished the bows off by giving the tails angled "v" cuts.


  Lastly, I hot glued both the finished bow and the letter 'G' to the wreath. I used a LOT of hot glue to keep them in place.


And, that's it.
I spent the better part of an afternoon working on this wreath.
A labor of love!


Burlap wreaths are so delightful and versatile. I'll be making one for myself next!

Wednesday, September 3, 2014

Teacher's Flower Pot.

  With the school year quickly coming to a close, we decided it would be nice to give my daughter's Pre-K teacher & teacher's aide some little 'End of the Year' gifts. I remembered a cute gift that my sister-in-law had made for her daughter's teacher last year, and thought I'd give it a try (I get a lot of good ideas from her, she's super crafty.)
  I'm calling it the 'Teacher's Flower Pot.' It's basically a decorated flower pot with the saying, 'Thank you for helping me grow,' on the side of it. The pot itself can be decorated in any way, and the saying could be written or painted on, or even spelled out in stickers. But, I modeled my flower pot from a Pinterest idea similar to the one that my sister-in-law used.

Supply list:
  • Black chalkboard paint
  • Yellow acrylic paint
  • Terra cotta flower pot, approx. 6" in diameter
  • Soil & a plant
  • a Marker
  • a piece of Chalk
  • Tape measure or ruler (optional)


  My daughter painted the upper rims yellow, on the inside and outside. Then, she painted the bottom outsides black, and I touched them up.


 Using a black Sharpie, I marked off 19 inches around the upper rims, while holding up a tape measure. My marks weren't precise. If you did want the marks to be exact inches, 1/2 inches, etc., you could tape a sewing tape measure around the pot, just below the top of the rim and make your marks.


   I wrote 'Thank you for helping me Grow!' on the side of each pot with chalk.


  Finally, we added some soil, a couple small petunia plants, and some more soil, to both pots.


  My little girl was so happy when she gave them to her teachers on the last day of school! She had a really great school year, and her teacher and teacher's aide were a big part of that. I also gave them thank you cards with a picture of my daughter and a gift card. 


Hope you enjoy this craft as much as we have!
         

Sunday, August 17, 2014

Teacher's Pencil Craft.

  Let me start this entry by saying that I was extremely thankful for my daughter's teacher this past school year. She was everything I'd hoped my little girl's first teacher would be: kind, caring, fun, and patient. At the first parent-teacher conference, she had so many wonderful things to say about my daughter. So, I figured I'd show my appreciation with a little gift. A crafted gift, of course!

  I found the idea for this project while searching through Pinterest.com for 'teacher's gifts.'

Here's a list of my supplies:
  • Pink & Yellow Paint
  • Black Marker
  • several inches of Painter's Tape and an x-acto knife
  • Block of Wood, about 12 inches of a piece of 2x4
  • small piece of Sand Paper
  • Miter Saw (or possibly another kind of saw)
  • Around 40 inches of wire, 16-20 gauge & pliers
  • Stickers for the Teacher's Name (optional)

  I started by marking the wood with two angled lines to for the tip of the pencil, and two small lines for notches around the 'eraser'. My husband used a miter saw to cut the wood. (Thank you, husband!)
After it was cut, I lightly sanded the whole piece of wood, getting rid of the sharp edges.

Wooden Pencil, after being cut & sanded.

  Next, I wrapped a piece of painter's tape around the wood toward the tip, and used an x-acto knife to cut a scalloped design all the way around into the tape, removing the tape on the side facing the 'eraser.' I was left with a piece of tape still around it that would create the look of a sharpened pencil.

After the yellow & pink paint.
  My daughter painted the yellow part, and then the pink part. She loves helping with crafts! Once the paint was dry, I colored the tip of the pencil with the black marker. 

Then, I wrapped a piece of wire around the notches four times, and pushed the end back behind the other wire. I took another piece of wire, about 8 inches long, bent it in half, and slid it under the wire already around the pencil. I curled both sides of the 8 inch piece around my marker, and stretched them out a little.

After adding the wire.
Almost complete.
  Finally, I added stickers to spell out her teacher's name on the pencil. If you have nice handwriting, you can write the name instead of using stickers.

My daughter was so excited to carry it into her 
classroom the next morning. She was beaming! 

  My husband, daughter, and I all contributed. We had a lot of fun making it together, and even made a second one for my husband's aunt!

Wooden Pencil craft!

Storybook Pumpkin Patch.

  This past fall, my daughter's school library asked for the students to create a Storybook Pumpkin Patch. The idea was to decorate a pumpkin (or pumpkins in our case) as your favorite storybook character and display it in the library during the week of Halloween. We were also asked not to cut or carve the pumpkins.

  So, my daughter picked out her favorite book and we attempted to recreate it- pumpkin style. :)

  The book she chose was Ladybug Girl and Bumblebee Boy, her favorite among the Ladybug Girl books that we own. They are an adorable group of books by David Soman and Jacky Davis. We decided to decorate two pumpkins, one to represent Ladybug Girl and one to represent Bumblebee Boy.


Here's how we made them:

Supplies:
  • Two baking pumpkins (they were cheaper and more manageble that the larger pumpkins)
  • Red, yellow, and black acryllic paint
  • small bowl for paint & paint brushes
  • about 24 inches of metal wire
  • 2 small rubber bands
  • 1 yard of red tulle
  • 12 small, black felt circles
  • 2 small, red pom poms
  • 2 12 inch pieces of red ribbon
  • Hot glue gun
  Unfortunately, I didn't photograph my steps very well. Hopefully the pictures of the finished products should answer any questions.

Finished Bumblebee Boy pumpkin.
  We started with the Bumblebee boy. This pumpkin was so easy to decorate, and my daughter did the majority of the painting. She started by painting the entire pumpkin yellow, first the top and sides, and after it was dry, the bottom. Next, I painted six black lines around the outside, each about an inch apart. My daughter painted black in between my black lines, creating three 1 inch stripes around the pumpkin. And our Bumblebee Boy pumpkin was complete!

  For the Ladybug Girl inspired pumpkin, we started by painting it red. Again, my daughter did the painting. The decorations for this pumpkin were a little more tricky, though, I made the pumpkin a tutu, a set of wings, and a headband.

  The tutu is a tiny version of a 'no sew tutu' using the red tulle and red ribbon. There are lots of different tutorials on youtube explaining how to make one of these, such as "How to Make a Tutu by CraftyGuides" and "Make a No Sew Tutu by Yolanda Soto Lopez." After I tied the tutu around the pumpkin, I got just a little black paint on the tip of my paint brush and lightly added some of the paint to the outer edges of the tutu. I was super careful not to add to much and have big globs of paint dripping from the tutu.

Our Ladybug Girl pumpkin decorations.
  I made the frame of the wings with some metal wire, I'm not sure what gauge the wire was, but I could bend it with my hand. The shape was basically two semi-circle/ovals that met in the middle. Also, I painted the frame black. Then, I stretched a small piece of tulle over each wing frame and tied each side off with rubber bands. Finally, I added the little felt circles to the wings. I put a dot of glue on one circle, and when I put in on the tulle I pressed another circle to it on the other side of the tulle, creating one polka dot. Each wing needed 6 circles, but it ended up looking like each wing had 3 polka dots. I added the wings to the pumpkin with hot glue.
Finished Ladybug Girl pumpkin.


  The last thing I created was a headband. I made a roundish circle of wire that fit around the base of the stem fairly tight, and added two pieces of wire to it, both sticking up. Then I curved the two pieces of wire. We painted all of the metal black. Then, I wrapped the wire circle in red ribbon. The finishing touch was the gluing little pom poms on the ends of the two wires sticking up. Super cute!


I was very pleased with how the pumpkins turned out! It was a great craft for my daughter and I, and they looked good in the library's Storybook Pumpkin Patch.

Ladybug Girl and Bumblebee Boy inspired pumpkins.

Wednesday, September 4, 2013

Dum Dum Topiary.

   Last week, my daughter's teacher gave the parents an opportunity to help the class out with some supplies and items. I enjoy helping the school in any way, so, I took a look at the list of what the teacher needed. Colored paper, highlighters, sticky-notes, etc., and Dum Dums! I immediately thought of making one of the Dum Dum topiaries I've seen on Pintrest. Here's how I made mine:
 
Supplies:
  • 5 inch foam ball
  • small square piece of foam
  • small tin container for the base
  • 3 small dowel rods (about 8 inches long)
  • 3 bags of Dum Dums (1 lb. bags)
  • ribbon
  • hot glue gun


5 in. foam ball, 3 dowels, a bag of Dum Dums, and a small, square piece of foam.
My tin, some ribbon, and a bag of Dum Dums.
   First, I cut off several chunks of the small square piece of foam and hot glued them down into my tin. This step is just for the stability of the foam ball. (You could used any kind of container for your topiary, a tin, a flower pot, a little basket, etc.) I added foam about 3/4 of the way up inside of the tin. Then, I stuck the 3 dowels down into the foam chunks, in a triangle pattern, about an inch apart. The length of your dowels really depends on the height of your container. I cut the dowels off 1 inch above the rim on the tin.


 Next, I added the Dum Dums to the foam ball. This was actually a little challenging for me. :) I tried to make sure they were evenly spaced, all sticking out at the same height, and look like they had a little bit of a pattern.

   After I'd covered half of the ball, I decided it was time to place it in my tin. I pushed it down on the 3 dowels until it reached the foam that was in the glued into the tin. It felt really secure. Then, I finished covering the ball with the Dum Dums. The bottom row of Dum Dums were pushed up from below, with their sticks going upward into the ball of foam. I did that so the topiary would have a very round shape, rather than a half-sphere shape.

   The last thing I did was hot glue a small, green bow to the tin, up near the rim. (Most of my crafts end up with at least one bow on them!)  If I had used a flower pot, with a wide, flat edge around the rim, I probably would have glued a ribbon around that edge before adding the bow.


     I hope the kids have as much fun enjoying the Dum Dums as I did making this topiary. :)

Tuesday, August 20, 2013

Crayon Wreath.

   A few weeks ago, my sister-in-law made a crayon wreath, and it was awesome! It looked like the kind of project that I'd love to try. I decided I'd make for my daughter's new teacher, and she could give it to her at the Meet-and-Greet night. What better way to start the year than with a crafty gift?
   So, I dug around on Pintrest for ideas and how-to videos. You can find all different techniques for making a crayon wreath and I got ideas from about a dozen different blogs and websites. Here's how I did it:

Supplies:
  • Crayons (I used a 64 pack)
  • 2 embroidery hoops (an 8 inch and a 10 inch)
  • hot glue gun
  • ribbon
  • stickers for decoration
   The first thing I did was lay the crayons out into a rainbow pattern (you don't have to do this, I just like the way it looked.) I only used 52 of the 64 crayons.


Two embroidery hoops & a 64 pack of Crayola crayons.
I left out the pile with black, random brown, and silver.
   Next, I centered the 8 inch hoop inside of the 10 inch hoop, and started hot gluing the crayons around the edge. I lined the crayons up using the black ring round the crayon wrapper, rather than the bottom of the crayons (again, I just liked the way it looked.)


About 1/2 through gluing crayons on the embroidery hoops.

   Once I had glued crayons all the way around there was too much space left for just one crayon, so I pulled up the first crayon I had put down and repositioned them both to take up the space evenly.


   After the crayons were all secure, I added some decorations. You can use school supplies, stickers, ribbon, pictures, wooden cutouts, little chalkboards, ornaments, etc.


    I decided to make a bow for the wreath using her school colors, and add some apples stickers. I kept it pretty simple. If I had known the teacher's name, I may have added it on there somewhere.


   Lastly, I added a ribbon at the top for it to hang from. I took one piece of ribbon and tied the ends in a bow. Then, I put the other end up between two crayons, brought the bow through the loop, and pulled it tight. There are lots of other ways to add a hanging ribbon, it's just important that the wreath is totally secure.
   It was incredibly easy, super cheap, and my daughter was so excited to give it to her new teacher! It turned out to be a really fun project. :)