So, I dug around on Pintrest for ideas and how-to videos. You can find all different techniques for making a crayon wreath and I got ideas from about a dozen different blogs and websites. Here's how I did it:
Supplies:
- Crayons (I used a 64 pack)
- 2 embroidery hoops (an 8 inch and a 10 inch)
- hot glue gun
- ribbon
- stickers for decoration
 |
| Two embroidery hoops & a 64 pack of Crayola crayons. |
 |
| I left out the pile with black, random brown, and silver. |
Next, I centered the 8 inch hoop inside of the 10 inch hoop, and started hot gluing the crayons around the edge. I lined the crayons up using the black ring round the crayon wrapper, rather than the bottom of the crayons (again, I just liked the way it looked.)

 |
| About 1/2 through gluing crayons on the embroidery hoops. |

Once I had glued crayons all the way around there was too much space left for just one crayon, so I pulled up the first crayon I had put down and repositioned them both to take up the space evenly.


I decided to make a bow for the wreath using her school colors, and add some apples stickers. I kept it pretty simple. If I had known the teacher's name, I may have added it on there somewhere.

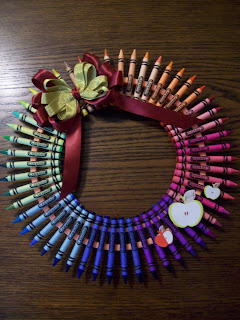

Lastly, I added a ribbon at the top for it to hang from. I took one piece of ribbon and tied the ends in a bow. Then, I put the other end up between two crayons, brought the bow through the loop, and pulled it tight. There are lots of other ways to add a hanging ribbon, it's just important that the wreath is totally secure.
It was incredibly easy, super cheap, and my daughter was so excited to give it to her new teacher! It turned out to be a really fun project. :)
No comments:
Post a Comment